Thursday, February 17, 2005

Out of the country

Blast all. Just now that I'm finally feeling top notch again and chomping at the bit to get back to ripping at the Vette, I've got to head out of the country for a week. Leaving Saturday and won't be back for a week. There goes 2 whole weekends down the drain!

I'll have 14 hours of mind numbing excitement on the flight out and back. I plan to take my Vizard and Sessions books with me and make lots of notes. Can't wait to see the looks from the Chinese nationals on the flight as I read books about Chevy Small Blocks. :-) Something tells me they won't relate. I'll try to post those next week as time permits. I tell ya', the job pays the bills and funds this nice little hobby but it sure can be inconvenient at times! : ack:

Monday, February 14, 2005

Motor/Tranny separated

I just couldn't take it anymore. I laid around the whole weekend like vegetables on a grocery display. This Flu is BAD stuff! So, I hadn't done anything with the motor/tranny since pulling it from the frame a couple of weeks ago. Got out there and after it and separated the two.

To do so, remove the bolts along the top of the bell housing at the back of the block. Also have to remove the 4 bolts attaching the torque convertor cover to the tranny at the bottom. Also have to remove the detent cable from the tranny to the carb. The only way I could see to do this was to remove the bracket on the block. Maybe there's an easier way but it wasn't obvious if there was.

Next, since the tranny is what's holding the back side of the motor down, put some wood blocks under the front fly wheel to keep it level as you slide off the tranny from the torque convertor. Also, you could do this the hard way like I did, but there's a ton of tranny fluid in the torque convertor. Be ready with a bucket to catch it all or you'll be cleaning up a mess on your floor! I know THAT from experience now.

Saturday, February 12, 2005

Whew.....

Man oh man! What a week. My back has been giving me an absolute horrible time for the past week. I made the mistake of pushing it on Saturday knowing it was out of place and I'm paying for it! I ain't as young as I used to be.

Then on top of that, I got the nastiest Flu bug running around here starting on Wedensday. Laid me out flat as a pancake on Thursday and I'm only now starting to get back up to speed. At least I ordered several books which I can read if my back decides to rebel a little longer. I stronglt reccomend these books:

How to Rebuild Your Small Block Chevy - Dave Vizard
Budget Building Max Performance Chevy Small Blocks - Dave Vizard
Turbo Hydra-matic 350 - Ron Sessions

Amazon had them all. Should be a good read based on what I've heard from others.

Wednesday, February 09, 2005

Engine Rebuild options

I've been putting a lot of thought into what to do regarding the engine. There is a 2nd 350 small block motor that Jim included in the deal. His plans were to build up the 2nd motor and take it into the 350-375 hp range and just store the original motor to maintain in the event of sale. I am about 99% leaning to this same approach. There are quite a few things that I have been able to learn.

From this article on Vortec heads:

http://chevyhiperformance.com/howto/97458/

as well as this step by step that they went through in evaluating the upgrade of components one at a time:

http://www.corvettefaq.com/c3/goodwrench/GM%20Goodwrench%20350%20test%20part%201.htm

I'm heavily leaning to the Vortec heads for the 350 buildup. I think I can do just about everything I want to in a budget of about $1500 for the engine. But of course this low price would mean I'm doing a vast majority of the rebuild work myself. The old motor already had the original heads pulled and there is some surface rust into the cylinders and exterior of the motor. I need to find a machine shop that can pull all the motor plugs and do a hot dip and flush on it to get everything out and then build it back from the bottom up.

As for the original motor, just store it away and therefore I wouldn't do a thing to it. The Voertec head requires a different intake to fit it anyway and I'd prefer to have a new water pump on the 2nd motor. About the only thing potentially worth using would be the carb but that is debatable if worth doing considering how far I'm going. So it looks like I won't use a thing off the original motor. It will end up being a survivor engine!

Saturday, February 05, 2005

Rear end tear down

I had some time to get in the garage and think about something other than my concern for Jim. I had laid out a plan for this weekend but I didn't get half of what I wanted done. Life's like that. Time to make some lemonade from these lemons. :-)

So, I got the following done this afternoon:

* Gas tank off. In taking the straps off the frame bracket I noticed the rust was a little thicker under the lower lip. I'll get some pictures later but I'm concerned about some steel patching I might need to make to keep it solid. I was disappointed that I could not find the build sheet on the gas tank. Oh well.

* All of the u-joints are disconnected.

* Exhaust system removed (had to cut the pipes where they go through the center of the frame to get them out but I'm going to keep them for oiginality. I plan to replace the exhaust system with new headers and pipes. Interesting that this was already a dual exhaust system with no Cat convertor. I thought this was a Fed requirement in '77. Maybe not? Anyone know about this?

* Rear spring removed. I'm trying to decide if I rebuild this or replace with a Fiberglass rear spring. That is a heavy bugger. I'm leaning to rebuild and reinstall the original steel spring to keep original as possible.

* Rear brake calipers removed

* Started on the trailing arm bolt removal. The nut came off fine but the bolt itself is pretty strongly bound up somewhere going through the frame and t-arm. I hit them both with some Liquid Wrench and let them sit.

Total time: 3 hours

Friday, February 04, 2005

Dedication to Jim

I never named the friend of mine that I purchased this car from for privacy reasons. His name is Jim Everett and is the preacher at the local congregation we attended there. I've known Jim for going on 13 years now. He's very knowledgeable, always had good advice, and an all around great person and Christian. He sold me the car because his knees were going bad on him and could no longer work on it. He had knee replacement surgery just a few days after I bought the car from him in late December.

I just learned today that he has very serious cancer and will likely not live much longer, maybe only a matter of days. This project takes on new meaning in light of this. I was motivated to do a quality restoration for my own reasons, but now I'm motivated even more to do something to continue his legacy of restorations of his own and to make something he'd be proud of.

Pray for him and his family.

Engine and Transmission pull

Pulled the engine and tranny last night. It was fairly straightforward to do with the body off the car. Did the following in order:

1) Removed the 2 brackets at the u-joint connecting the drive shaft to the tranny
2) Removed the 2 tranny mount bolts under the body that is just below the u-joint just disconnected
3) Removed the exhaust pipe connecting nuts to free up the manifold connections
4) Removed the power steering pump bolts at the block and set the unit to the side. I did not remove the unit at this point.
5) Disconnected the fuel lines from the fuel pump at the frame connections where it changes from steel lines to flexible rubber hose lines.
6) Remove the ground strap connection near the fuel pump that goes from the engine block to the frame near the upper A-arm of the right wheel.


Rear tranny mount plate where the 2 bolts attach underneath this plate Posted by Hello


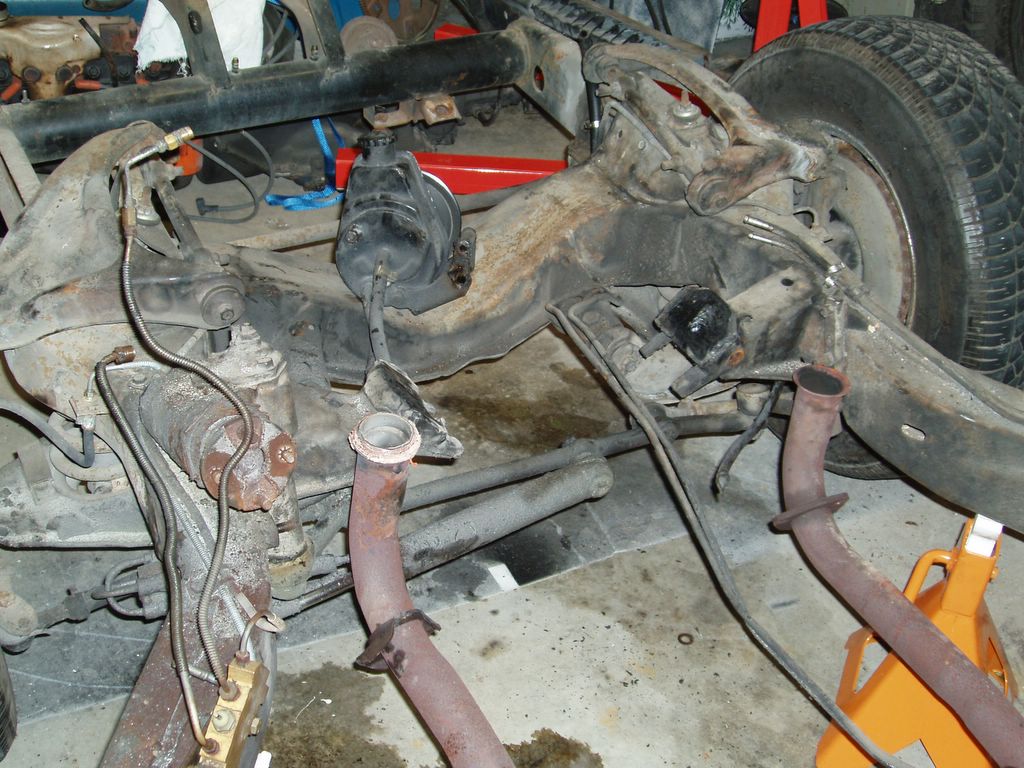
Front end after engine removal. Brake proportioning valve on left with brake lines. Fuel lines and ground connector on right near engine mount Posted by Hello

At this point I went ahead and built up my engine stand to get ready for mounting the engine to the stand once it's removed. Only took about a 1/2 hour to do that. Next, wheeled the shop crane under the front of the car. The jack stand placement was just far enough back to allow me to get in enough with the crane. The cranes front legs were touching the stand bases. That was close without needing to reposition them!

I connected up the straps to the 2 brackets that are diagonal across the engine, one just to the lower right of the distributor and the other at the front left of the engine. I'm using 2 sets of nylon straps rated at 800 lb each. Should be ok. Jacked up the crane a little to get it off the mounts and make sure nothing was missed. Then went ahead and jacked it up about 6 inches. The whole thing is heavy in the back because the tranny is still attached. The u-joint needed a little coaxing with a hammer to disengage it from the tranny half of the joint still attached.

Went ahead and jacked up the engine and tranny to clear the front of the frame to set it aside for the night. I'll have to take the tranny off the motor this weekend and then mount the motor to the engine stand.

I've got to do something about space in the garage. It's getting tight between the boxes of parts and both sides being consumed with a disassembled Corvette!

My goals for this coming weekend are:

* Get the gas tank off (that's easy enough)
* Tear down the rear suspension
* Tear down the front suspension
* Remove the old brake and fuel lines on the frame.

If I can get all this done, then I'll be in good shape to clean and sand blast the frame sometime next week. The weather here has been horrible for about 10 days straight. If it breaks next week I'll have to take a day off to clean and blast it. There are 4 body mounts that are rotted that need to be replaced. I'm trying to decide if I'll learn to weld and put on the new mount brackets to the frame myself or pay someone to do it for me. I may do some practice on some spare steel and then decide what to do.

I've got a trip out of the country coming in a couple of weeks and I'd like to be able to have the engine and tranny off for rebuild while I'm gone to minimize down time. We'll see. It's going to be a busy couple of weeks coming! If I can get all this done before leaving then I'll be on track to get this project done by my target of June....this year.

Wednesday, February 02, 2005

Someone else's Silver/Blue Vette

I was out looking for some pictures of Silver/Blue Vettes so I could get an idea of how this project will trun out in the end. I found this one on the net. The color is starting to grow on me espcially since it's not the tradtional Red or Black that you see on the road most of the time.


Someone else's 1977 Vette in Silver/Blue Posted by Hello

Shameless plug

ok, ok. This is a shameless plug. I'm doing this project and posting information about where I'm getting my stuff from. Any vendors out there want some sponsorship skin in this project? Drop me a line.

Tuesday, February 01, 2005

I think I know how I want me restoration to look

I can't help myself. I found these when looking for some ideas onrestoration techniques. I think this is exactly the look I want to get whenI'm done with the resto!


Corvette restoration possibilities Posted by Hello